WordPress is the famous CMS(Content Management System) globally; with this software, anyone can build websites easily without touching a single line of code. Sometimes, beginners install WordPress manually and accidentally install it on the subdirectory instead of the root directory; this seems less. For example, they install the “/wordpress/” or “/example/” directory where examples can be anything. This makes the WordPress URL looks like this.
https://yoursiteurl.com/wordpress/
https://yoursiteurl.com/example/
For SEO purposes concentrating on the root domain will show the best result, and you should focus on it when you start a website instead of diluting it. Search engines such as Google have improved their algorithm, giving attributing keywords back to the root URL.
In this tutorial, I will explain how to remove “/wordpress/” from your WordPress site URL?. If you want to know how to add a Subdomain or Sub Directory, check out here.
Removing /wordpress/ from your WordPress site URL
You can remove the “/wordpress/” URL by using four different methods. Now we will see them one by one. You can follow any type based on your requirements.
Method 1: Remove /wordpress/ From URL from Empty site (no content added on your site)
If you just installed WordPress on the wrong folder with no content, then you don’t need to read this whole article. You can delete or uninstall WordPress from the subdirectory and reinstall WordPress on the root directory manually or use a one-click installer.
Now, most of the hosting providers offer a one-click WordPress installation feature from your control panel (cPanel); you can use them to install WordPress quickly.
Follow any method if you have already added content to your WordPress website.
Method 2: Move WordPress Subdirectory files to the root folder.
If you implement this method correctly, you can easily move all your WordPress core files to root. But in this method, you need to have a basic knowledge of databases. Before changing anything, take a full backup of your WP website.
You can log in to root by using FTP client software such as FileZilla. In this guide, we are using the cPanel method to access the root.
Open your cPanel by either login into your hosting or directly by adding “cPanel” at the end of your website URL.
https://yoursiteurl.com/cpanel/
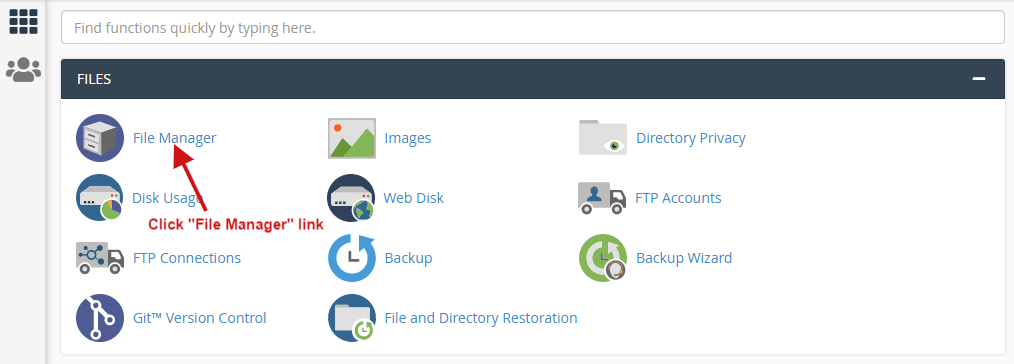
After opening, click File manager on the files section.

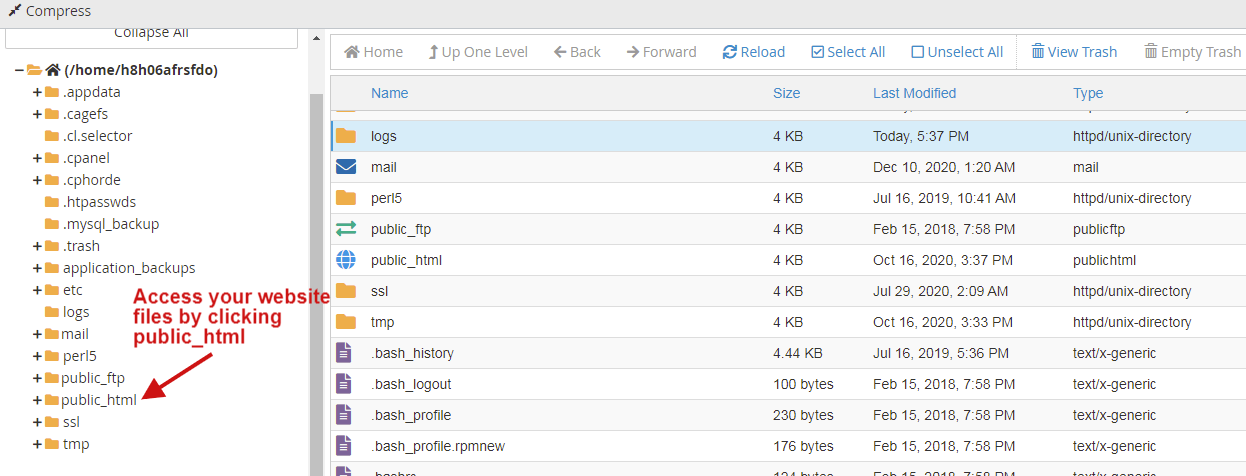
After the File manager opens up, click Public_html to see the root directory.

In the root, you can see the WordPress folder. In this folder, all of your installed WordPress core files are present.
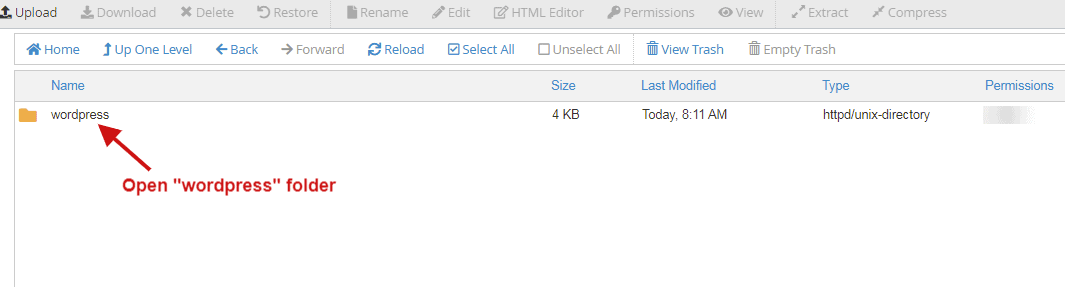
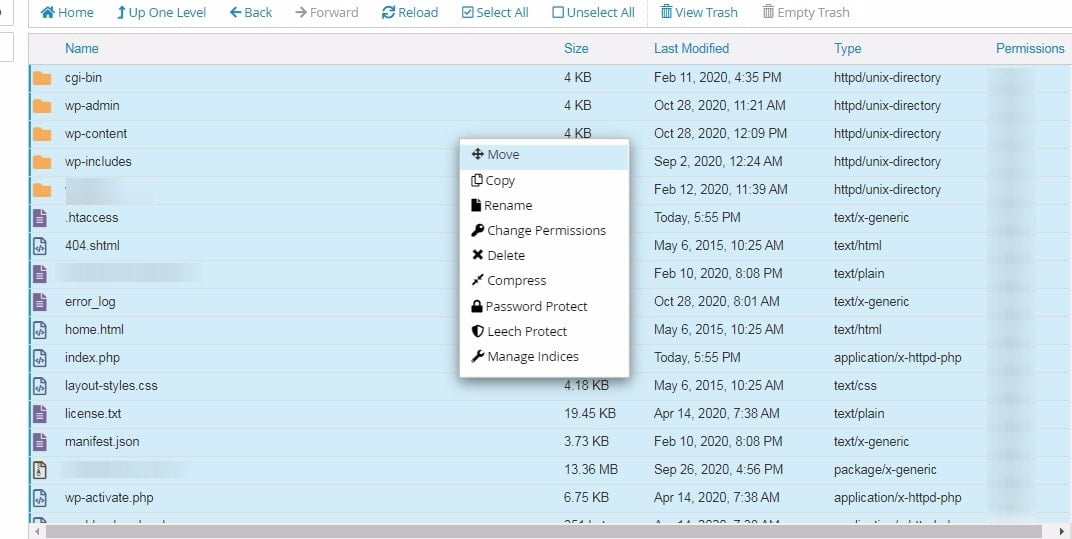
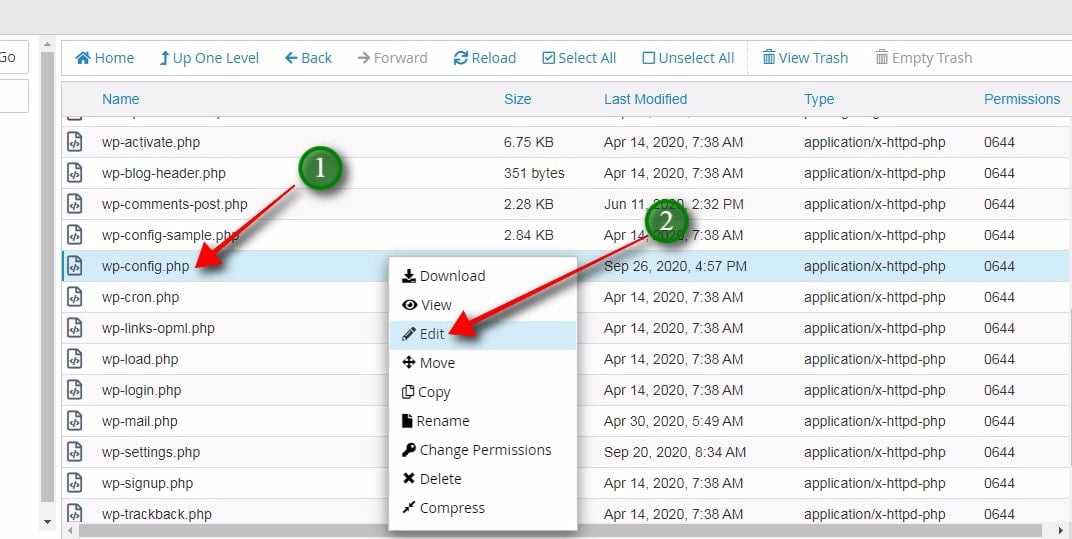
Go inside of WordPress folder and select all files, and right-click to see more options. Then click “Move,” and a window will pop up.
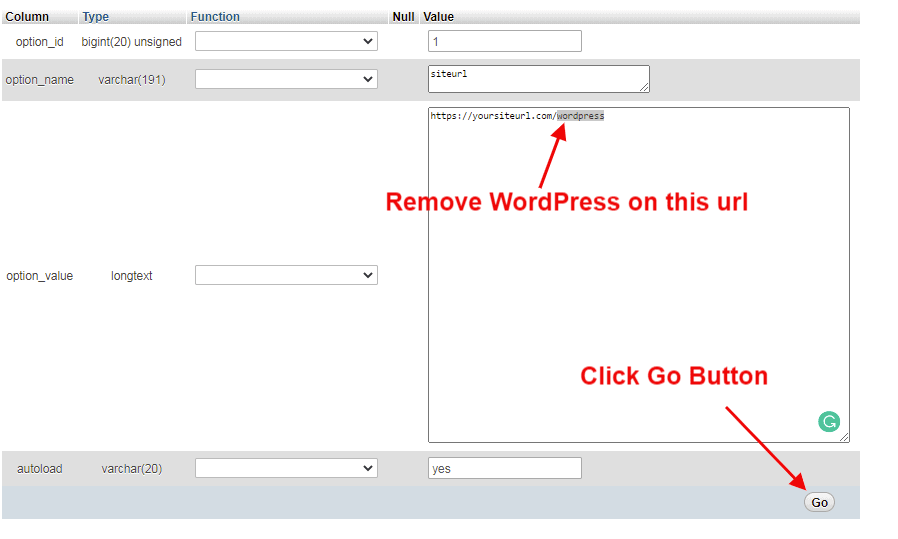
In this pop-up, remove the file path field “/wordpress” and click the “Move Files” button.
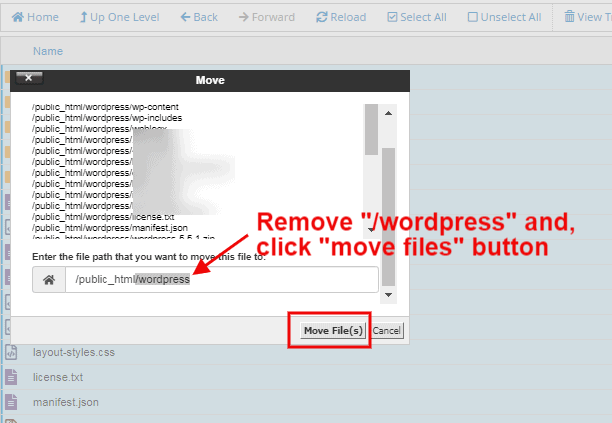
After clicking the move button, all subdirectory files move into the root folder.
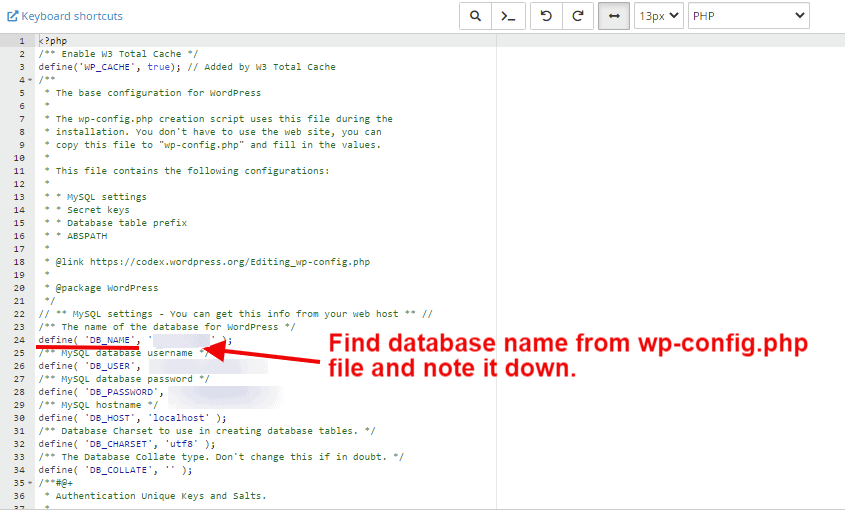
Now to find the database name, we need to view wp-config.php and search DB name.
Right-click and view the wp-config.php file on your root directory.
On wp-config.php, you can view database details, and now you need to take a note of DB_NAME(database name).
The next step is to go to cPanel; on the search bar, type PHP. The result shows phpMyAdmin under the database section and clicks that link or icon.
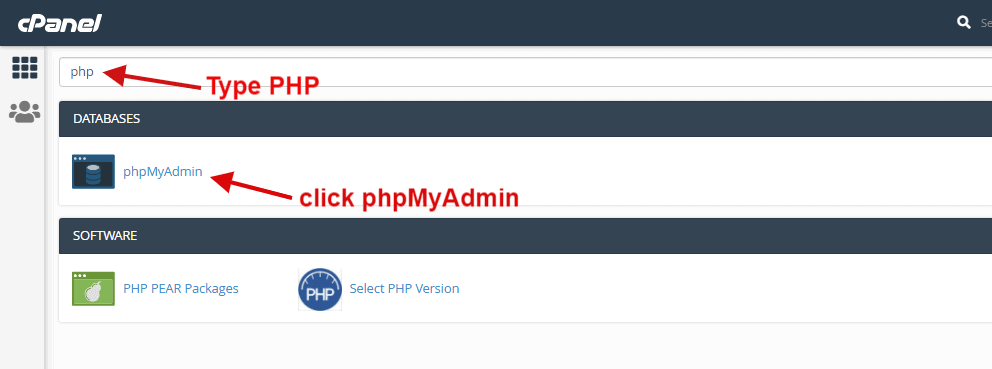
It will open phpMyAdmin, and here you need to find the Database name you already noted down previously from the wp-config.php file.

After locating your database name and click it to see the wp_options database table.
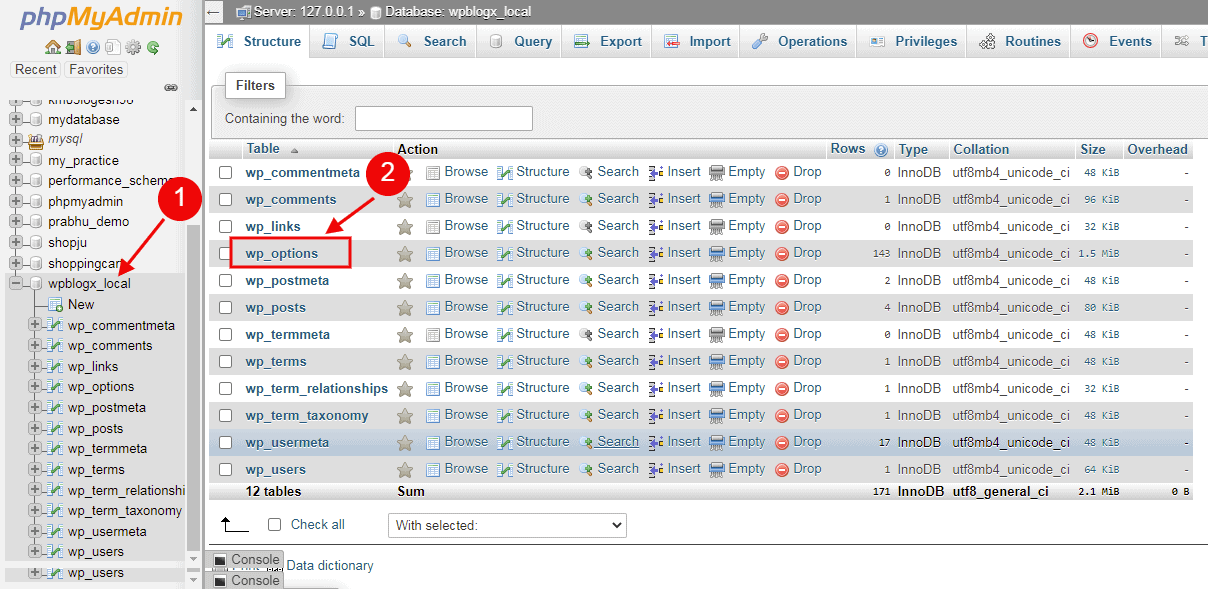
Now it shows rows inside of the wp_options table. You need to find the Site URL and Home URL in option_name.
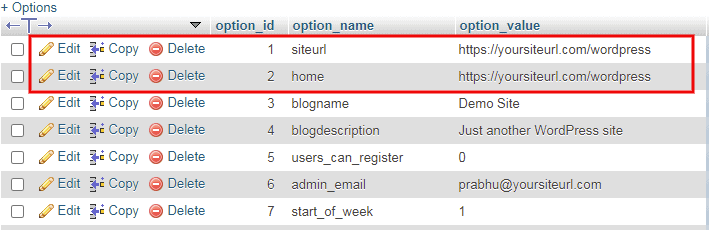
You need to click the pencil icon to edit option_values and update the Site URL and Home URL as https://yoursiteurl.com/.
Now both site URL and home URLs are updated with the root domain URL.
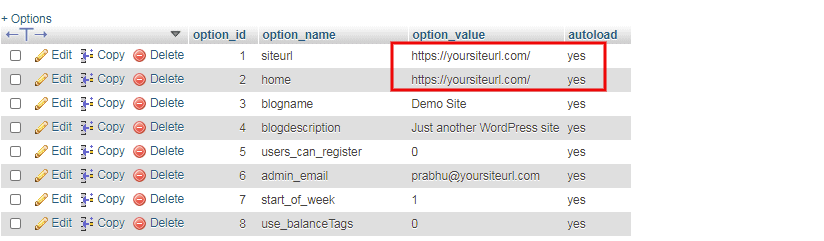
With this, you have removed /WordPress/ on your website URL successfully from cPanel.
Method 3: Change Site Address URL Field
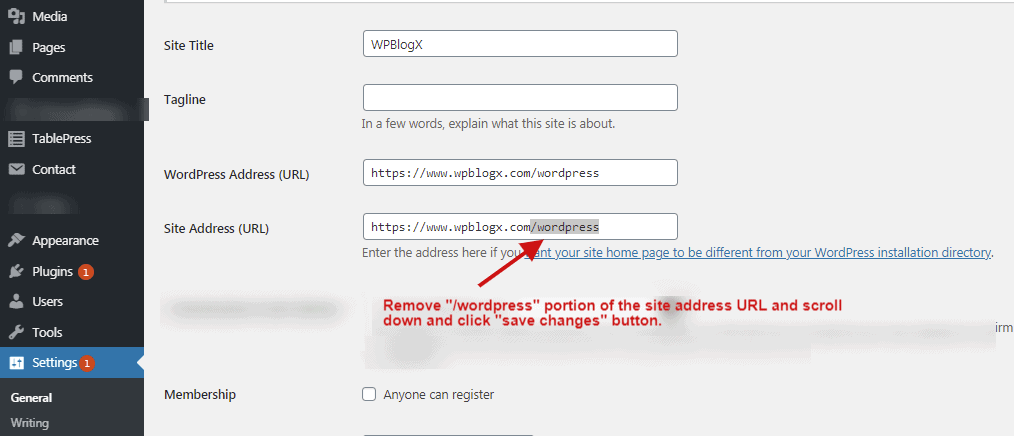
First, you need to login to your WordPress Dashboard. For example, your WP-Admin URL looks like this:
https://yoursiteurl.com/wordpress/wp-login.php
On the WordPress Admin dashboard, go to Settings > General page and remove “/wordpress/” on the Site Address (URL) field and scroll down to the end of the page, and click the “save changes” button. You don’t need to change anything on the WordPress Address (URL) field.
This method has a drawback; media file URLs show like this https://yoursiteurl.com/wordpress/logo.png. If you are ok with this method, go ahead else follow other methods.
Next, log in to your site cPanel and click file manager in the files section. Your site cPanel link looks like this https://yoursiteurl.com/cpanel.
Now open public_html from the file path, and you will be able to access your WordPress directory.
Open the WordPress folder from the root.

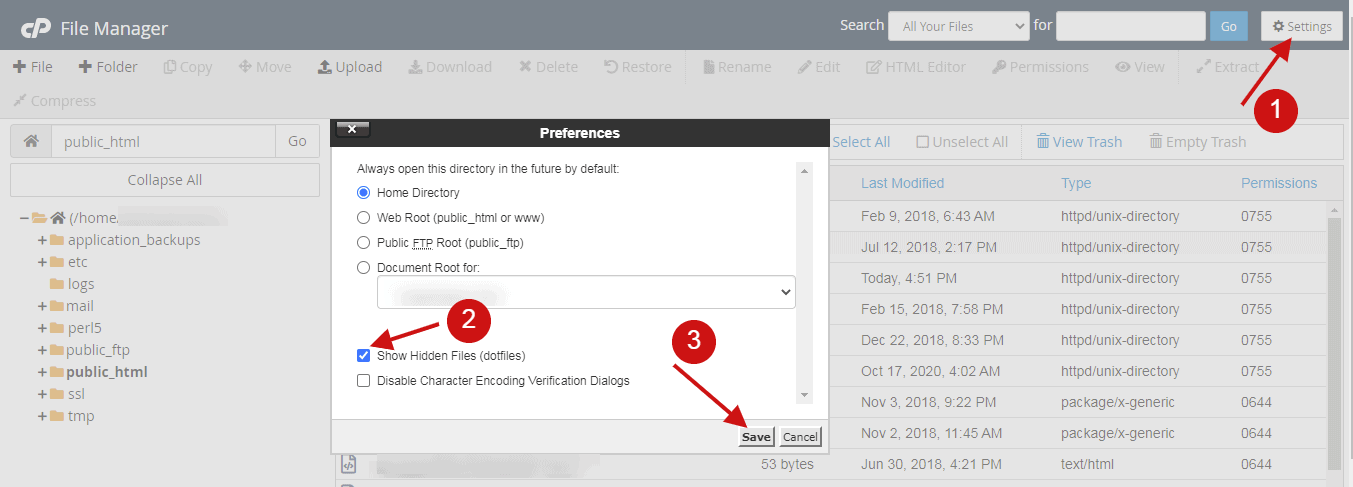
For this method, we need to view the .htaccess file. But by default, it’s hidden. From your WordPress folder, we can enable hidden files by opening Settings on the top right corner.
On the bottom, a preference window will pop up, enable “show hidden files,” and save the change.
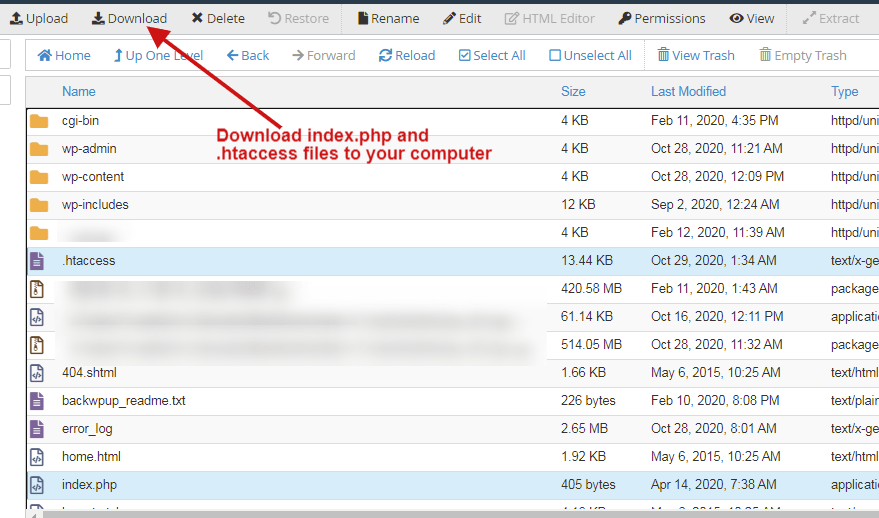
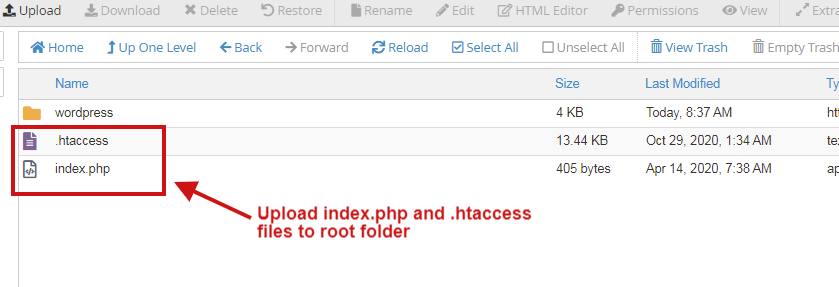
The next step is to select both index.php and .htaccess and download files onto your local computer.
You don’t need to edit anything on the .htaccess file here; it controls how your website’s permalink structure, redirect rules, and configurations of how the search engine goes into your content. We will need to copy it to the root directory from the subdirectory.
Editing index.php File
You can edit the index.php file on your PC by using Notepad. In the index.php file, find this code:
require _DIR_ .’/wp-blog-header.php’;
Replace it with the following code
require _DIR_ .’/wordpress/wp-blog-header.php’;

After editing the index file, click the save changes button. Finally, upload this index and .htaccess files into the root folder.
Finally, you have got rid of “/wordpress/” at the end of your website URL.
Method 4: Migrate WordPress files using All in One WP Migration Plugin
Log in to your WP admin panel, where you want to migrate it to the root.
Step1: You need to install the All in One WP Migration plugin on your WordPress site. Here is the tutorial on how to install a WordPress plugin.
Step 2: After installing the plugin, click the All-in-One WP Migration left sidebar menu in your WP dashboard and then go to Export > File.
It will show you the popup, and it will take some time to collect your files. Finally, it shows a download button, and now you can download it on your local system.
Note: If you want to take a backup on any other source such as Google Drive, One Drive, Amazon, etc., it is possible with this plugin.

Step 3: After the backup is completed, you need to install WordPress on your root folder using the manual or one-click installer method.
Note: After successfully installing the website on the root, only remove the old WordPress folder for data safety if the imported data got corrupted.
Step 4: Log in to the freshly installed WordPress and install the All-in-One WP migration plugin.
A typical WordPress login link looks like this – https://yoursiteurl.com/wp-login.php.
Step 5: Go to All-in-One WP Migration > Import and then click the “Import From” button.
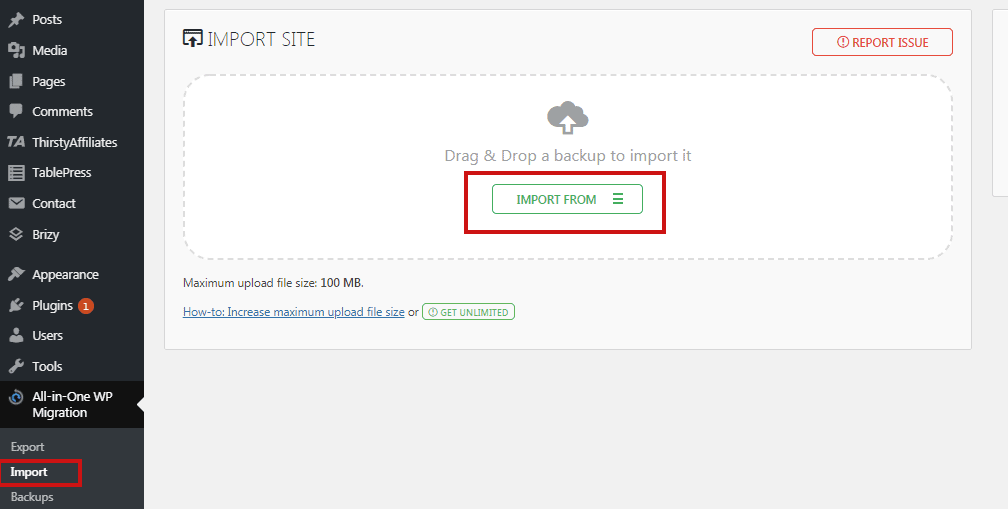
Step 6: After clicking the “Import From” button, you need to select the file from your computer you already downloaded(select path).
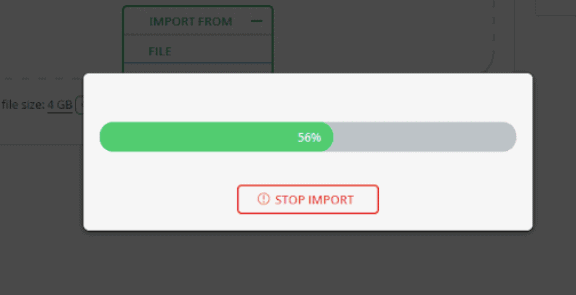
Now importing starts, and you can see how much it has progressed on your screen.
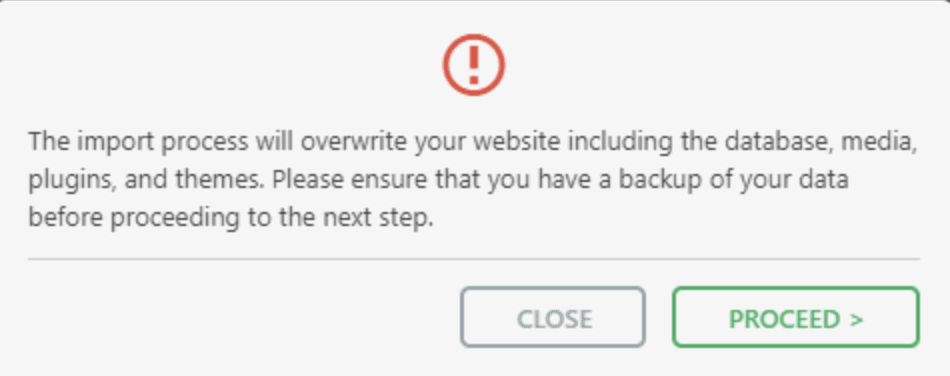
Step 7: After progress is completed, the plugin will show the following warning message you need to click the “Proceed” button to continue.
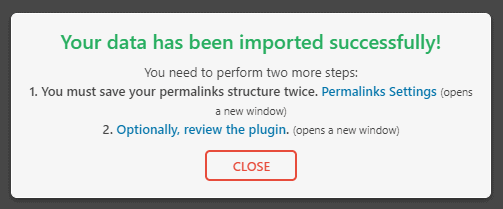
Step 8: Finally, you will get a popup message showing, “Your site data is successfully imported.”
You can able to see your WP site URL without “/WordPress/”. Now delete or uninstall the old WordPress folder from your root.
Conclusion
This is how we move our WordPress site from “/wordpress/” (subdirectory) to the root directory, without losing any data from it. If the database method seems difficult follow the All in One WP migration plugin method, which is safer and faster.