If you are unaware of creating a MySQL database by using phpMyAdmin, then you are at the right place. Read the entire article and am sure you will be able to create a MySQL database by using phpMyAdmin at the end of the article.
phpMyAdmin is the most popular web application for MySQL database management system. It is actually a free tool written in PHP scripting language. With the help of this tool, you can create, drop, alter, delete, import, and export MySQL database tables. Then you can run MySQL queries, repair and check tables, optimize, change collation, and can execute other database commands.
Using phpMyAdmin, MySQL database can easily import data and can also import an SQL or CSV dump with just a few clicks. You can even easily export your database in CSV, Excel, XML, SQL, and other popular formats. MySQL is a free open source relational database management system.
It is widely used nowadays all over the world to alternate SQL. MySQL is the modernized way to add, delete, and modify information in the database. You can install phpMyAdmin and MySQL from its official web page and install it in your system.
Steps to create a MySQL database by using phpMyAdmin
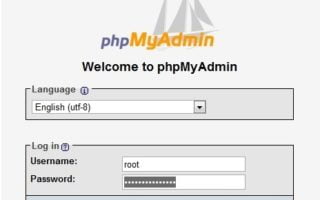
Step 1: Initially navigate to your phpMyAdmin homepage. It will be located under the directories, depending upon your server setup. Make sure you have logged into phpMyAdmin.
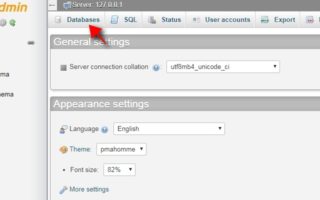
Step 2: Once you enter into the screen, you find a button “Databases” at the top of the screen. Enter the databases button in order to create a database.
Step 3: Once you clicked you will find an option to “create new database” with the text field.

Step 4: Enter the database name that you want to be used and then click the “Create” button.

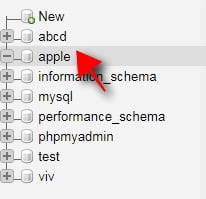
Now the created database will be present in the left-hand side of the list of databases available.
Now you have set up the new user to access the created database.
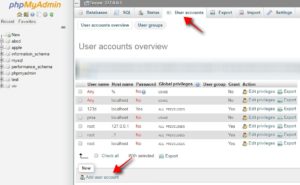
Step 5: To set up the new user, click on the “Users account” tab in the main menu and choose the “Add user account” link under the list of available server users.
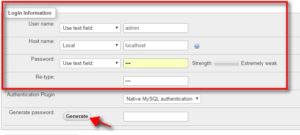
Step 6: In the Login Information section, type in the username, hostname, and a password in the required fields. You can even press the “Generate Password” button to randomly generate a password for you.
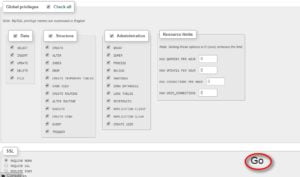
Step 7: Then in the Global privileges section, tick the “Check all” option and then press the “Go” button at the end of the screen.
That’s it, you have created the new user login. You can sign out and then sign in to check the new user login for the database.
Conclusion
It is actually very easy to create to MySQL database using phpMyAdmin. Hope with the help of this article you can create a MySQL database using phpMyAdmin. If you have any queries or suggestions please feel free to comment to us.