
Looking to place the Google Adsense on your website?. That’s nice, you are in the right article. In this post, we will let you know how to add Google Adsense to your website. As soon as you build your WordPress website, then the next step you think about earning money with that site.
Don’t just blindly use flashy ads from ad networks that make your website clumsy. It is important to choose the right ads. Google Adsense is the best popular service available. Google Adsense is one of the most powerful ways to monetize your WordPress website.
It helps you to easily display video, text, image, and other interactive advertisements on your website. In order to make money with Google ads, you just need to add the Google ads to your website.
What is Google Adsense?
Google Adsense is the most popular and powerful advertising network which is owned by Google and lets you add the Google ads easily in your WordPress website to make money.
It is a Cost Per Click (CPC) program that helps you to display advertisements on your website. It is like you will get paid for every click that users make on your website ads. It is a hassle-free network. You don’t have to deal with any advertisers or about the money.
The Google administers maintain a relationship with the advertisers. They will collect the payment, and pay money to you at the right time. Google will take a small part of the money as the management fee.
What type of ads can we display?
Initially, you have created an Adsense account, and once your Adsense account is approved by Google, the Google spiders will crawl your website to get the familiar with the page offerings. Then it assists the Google bots to place the best fitting advertisement in different locations in your website.
Like for example, if your website is about clothing, then the Google bots will keep this as a keyword and dig its database to find the most suitable clothing ads for your website and it will automatically place it on your website.
It is easier for the visitors who are very much eager in searching for fashion clothing is more likely to buy them. Google Adsense is a super cool, reliable, flexible, and logical way to monetize your WordPress website.
Getting started with Google Adsense
Signing up Adsense account
Step 1: Initially, you must have a Google Adsense account to work with it. If you don’t have to make sure you sign up Google Adsense and create an account, You can even sign in with your Gmail account.
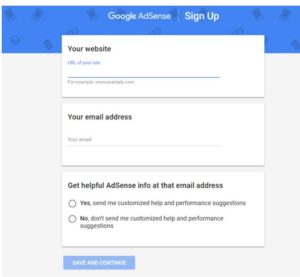
Step 2: In the next page, enter the website URL and email address. Then you can choose like you want to get helpful Adsense information to the email address by selecting the option and then click “Save and Continue” button.
Step 3: Then select the home country and tick the “Terms and Conditions” box to process further and then click “Create Account” button.
Step 4: When you see Google Adsense homepage that means your account is created successfully. Then the next step is to activate the account.
In the Google Adsense homepage, you will see 2 tasks to activate the account:
- First to provide the payment address
- Second is that you need to connect your WordPress website to Adsense
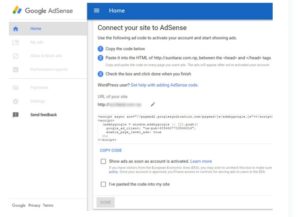
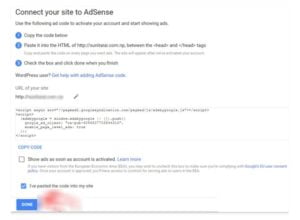
In order to connect your WordPress website to Adsense, you have to place a piece of HTML code to your website’s header. You can get this code on your Adsense homepage and just copy the code.
Step 5: In order to add this code to your website, login to your WordPress dashboard and install “Insert headers and footers plugin”. With the help of this plugin, you can insert the code in your theme’s header and footer without touching your themes file.
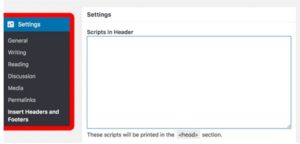
Step 6: Once the plugin is installed and activated, navigate to Settings>Insert Headers and Footers and then paste the copied code in the header field. The code is now added in your WordPress.
Step 7: Now return to your Adsense account and click the checkbox stating“I’ve pasted the code into my site” and click the “Done” button.
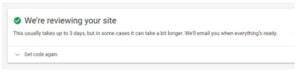
Now, you will receive a message from the Adsense team that they are reviewing your website. Just wait for them to complete the activation process usually a couple of days.
Creating Google Adsense Units
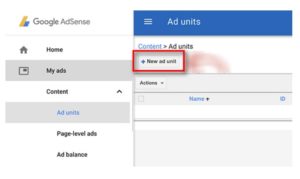
Step 1: Once you receive the message from Adsense team that your account is activated, now you will be able to access all the Adsense options. You can start creating the units with the options available.
Step 2: First click the “My Ads” tab and then select “Content”. Then click on “Ad Units” button and then “New ad unit” button.
Step 3: Once you click on to that button, you have to enter the name to your ad unit and then select the ad size, type, style, and color as per your wish.
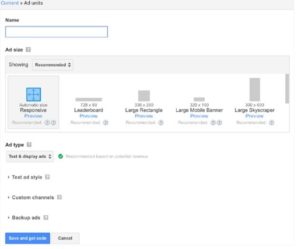
Step 4: From the ad size option, you can choose the dimensions of your ad. For best results make sure you choose from the recommended list.
Step 5: In the ad type option you can select the type of your ad.
Step 6: You will see the Text & display ads as default, you can just go with the default selection.
Step 7: Then the ad style option helps you to customize the look of your ad. You can change the design and color with this option.
Step 8: Then the next option “Custom channels” helps you to track the ad performance based on your website and it is optional.
Step 9: Then the final option is “If no ads available” lets you set what you would like to show if Google doesn’t find any relevant ads for your website. That’s it, you are done with the setup. Now click “Save and get code” button.
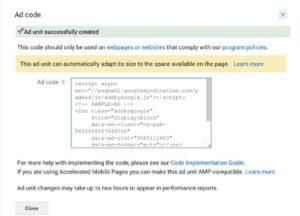
You will get the ad code, just copy the code and place in notepad, because you need to use this code.
Add Google Adsense to WordPress Manually
Once the ad unit is created, you are now ready to add ads to your WordPress website.
Usually, ads are displayed in the sidebars or widget areas like the footer. It is very easy to add the ad code to your websites sidebars and other widget areas using the widgets section in your admin panel.
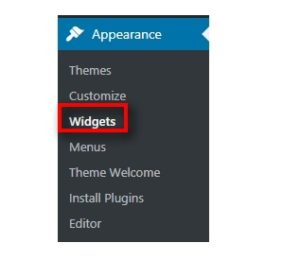
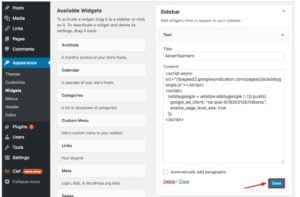
Step 1: Initially, login to your WordPress website and navigate to Dashboard> Appearance> Widgets section.
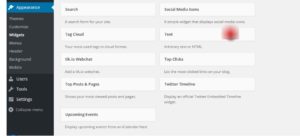
Step 2: To add a new widget, you have to select the Text option and drag and drop to the place wherever you want to display the ads on your website. For example, if you want to place the ad to the sidebar, choose the sidebar and press the “Add Widget” button.
Step 3: Then fill the Title and Content fields. In the Title field enter the name of your widget and in the content field paste the ad code which you are copied earlier.
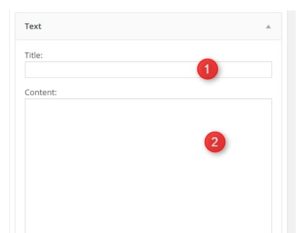
Step 4: Everything is done, then press the “Save button”.
That’s it, now you can navigate to your website and check how the ad looks.
Note: You can even add Google Adsense to WordPress using plugins. There are popular plugins such as Google Adsense, Ad Injection, Ad Inserter, WP Simple Adsense insertion, Easy plugin for Adsense, AdRotate banner manager etc. You can make use of the plugins and add the ads to your WordPress website.
Add Google Adsense to WordPress using plugins
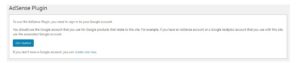
Here we have chosen Google Adsense plugin since it is very easy to use even for the beginners. When you go for plugins, you no need to create ad units.
Step 1: Install and activate Google Adsense plugin.

Step 2: And then navigate to Settings>Adsense.
Note: Then it is important to sign into your Google Adsense account before using this plugin.
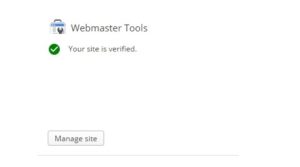
Step 3: Then click the “Get started” and verify your website.
Step 4: If the verification process is done, you will see a message that “Your site is verified”. Then right click on the “Manage site” option.
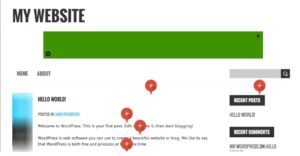
Step 5: Finally, click the “Preview” button to view the sample ads. You will find many markers in different sections. You can click on that marker icon wherever you want to place the ad on your website.
Step 6: Then click on “Save and Activate” button to save your changes.
Advantages of adding Google Adsense
- Flexible advertisement format
- Seamless support
- Prompt payment
- An instant way to monetize your website
- Easy to use with multiple websites
Conclusion
Google Adsense makes your website more visualize and helps you to earn money. It is very easy even for the beginners who started using WordPress website. Hope you got an idea about how to add Google Adsense to your WordPress website.
If you have any queries or suggestions please feel free to comment to us. You can subscribe to us at Facebook and Twitter.